5.1 Chartwork
Although it’s possible to do everything you need to on a chart with a hiking compass and a folding ruler, it’s much easier to have a few simple instruments and know how to use them.
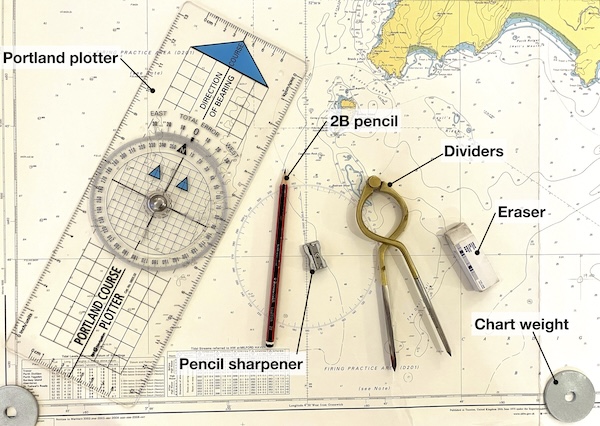
2B pencil: a soft pencil is preferred for chart work as it’s easier to erase once you’re done (or in the unlikely event that you make a mistake!).

Pencil sharpener: to keep your pencil nice and sharp
Eraser: to deal with any mistakes and remove the lines from the chart once your planning is complete so the chart is ready for the next time
Chart weight: Given the size of many charts, they tend to get stored rolled up, so it’s helpful to have something to weigh them down while you work on them. You can, of course, buy beautiful brass chart weights at great expense for this purpose. Large washers (e.g. M10 penny washers) cost almost nothing and work equally well.
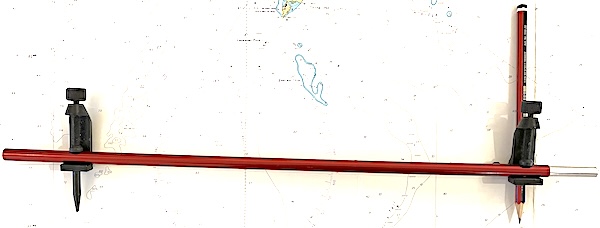
Plotters: The ‘Portland’ or ‘Breton’ plotter is basically a big hiking compass without the magnetic needle. It can be used to measure bearings and draw lines at define angles. It’s big enough to be useful as a straight edge too.
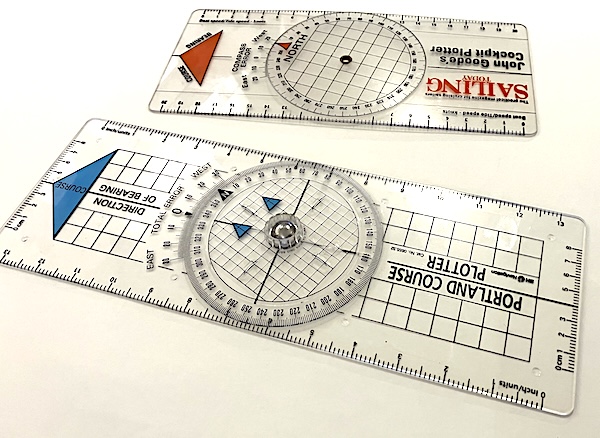
The Portland Plotter shown (below, blue parts) in the image below is rigid, easy to use and my preferred option for chartwork. You can buy these from many Chandlers and the RYA. The other plotter (above, red parts) is smaller, very thin and flexes. It’s much less nice to use, but easier to keep with pilots, books etc in you navigation ‘kit’ if you only intend to use it occasionally.
Dividers: Whilst a pair of drawing compasses will work, there’s nothing like a pair of brass dividers to bring a bit of mystique to your chart work. The shape of these dividers is intended to enable one-handed use.
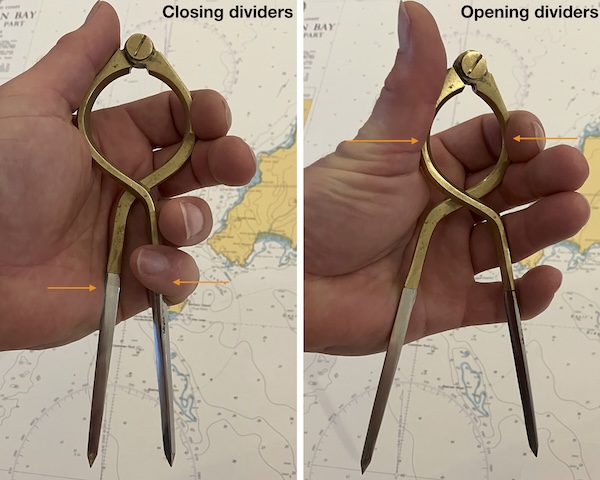
The dividers can be closed (i.e. made to measure less distance) by squeezing their legs together, as you might expect. The dividers can be opened (i.e. made to measure more distance) by squeezing the top part. This means that you can set the dividers with one hand. Notice that I’m using my left hand here as I prefer to hold my pencil in the right hand.
If longer distances need to be be measured, the dividers can be opened in the opposite direction:
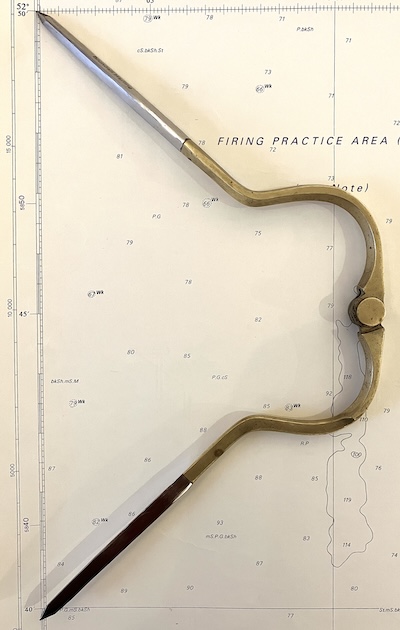
For measuring and marking off larger distances, it’s possible to use the scale on a plotter or a long ruler. The right tool for the job is a beam compass or trammel.It’s now possible to buy these fairly cheaply online, but this hasn’t always been the case. I made mine from a pair of cheap trammel points attached to an old tent pole section:
Of course, the device can be made even longer by slotting on another section of tent pole and securing it with a bit of tape:

Most people are able to do without a beam compass, but it’s a nice to have if you’re planning lots of chart work, perhaps in the run up to an advanced leader assessment.
5.1.1 Measuring bearings
The plotter can be used in the same way as a hiking compass to measure a bearing off the chart
Find the bearing of the Causeway Buoy from the West Island of the Saint Tudwal’s Islands.
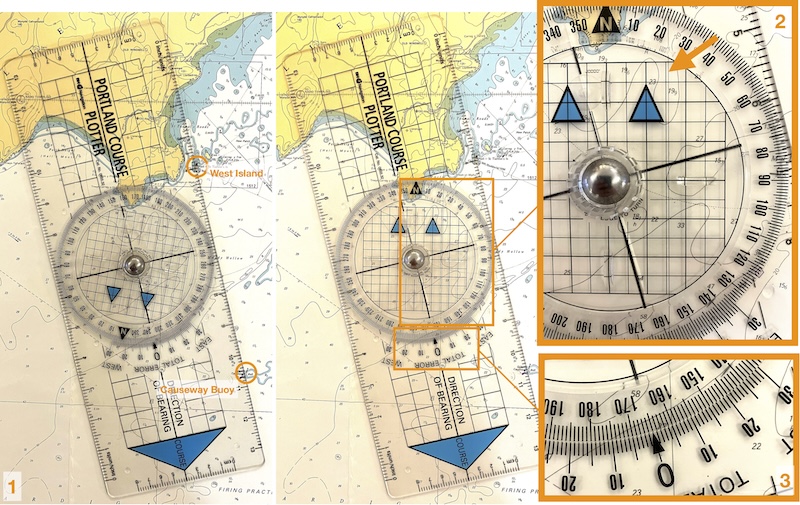
1: Place the plotter on the chart so that the bearing line is along one of it’s edges. Here we ensure that both the West Island and the Causeway Buoy are on the edge of the plotter.
2: Rotate the bezel of the plotter until the arrows on the bezel point to the north direction of the chart. Notice here how one of the vertical lines on the bezel has been carefully aligned with one of the gird lines on the chart (arrow).
3: Read off the bearing from the plotter - it’s 165˚, as measured at the ‘0’ arrow.
5.1.2 Marking vectors
We often need to mark lines of a defined length and direction to denote bearing of tidal drift or distance paddled. To do this, we use the plotter to find the correct direction and the dividers to transfer the required distance from the chart’s scale.
*Draw a 3 nautical mile line at bearing 130˚ from Carreg Ddu to denote tidal drift
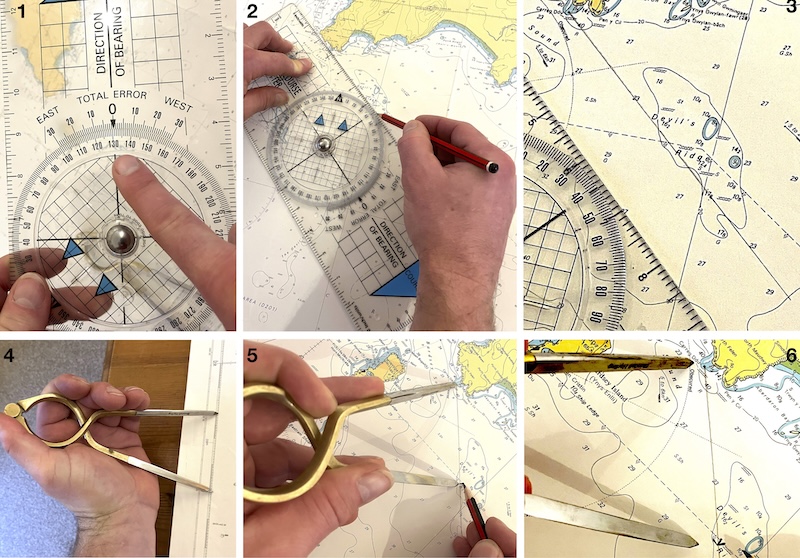
1: Set the plotter to the required bearing of 130˚
2: Place the plotter on the chart so that the lines and arrows on the bezel are aligned to north. Slide the plotter until its edge is at Carreg Ddu. Draw a line from Carreg Ddu that is somewhat longer than the 3 nautical miles required
3: The pencil line drawn at 130˚ from Carreg Ddu
4: Set the dividers to 3 nautical miles. Here the latitide scale on the chart is used
5: Place one point of the dividers at Carreg Ddu. Mark where the other point lies on the line.
6: Completed vector.